
Machine Tool Guards and Shields
Adjustable Belt and Disc Sander Shields
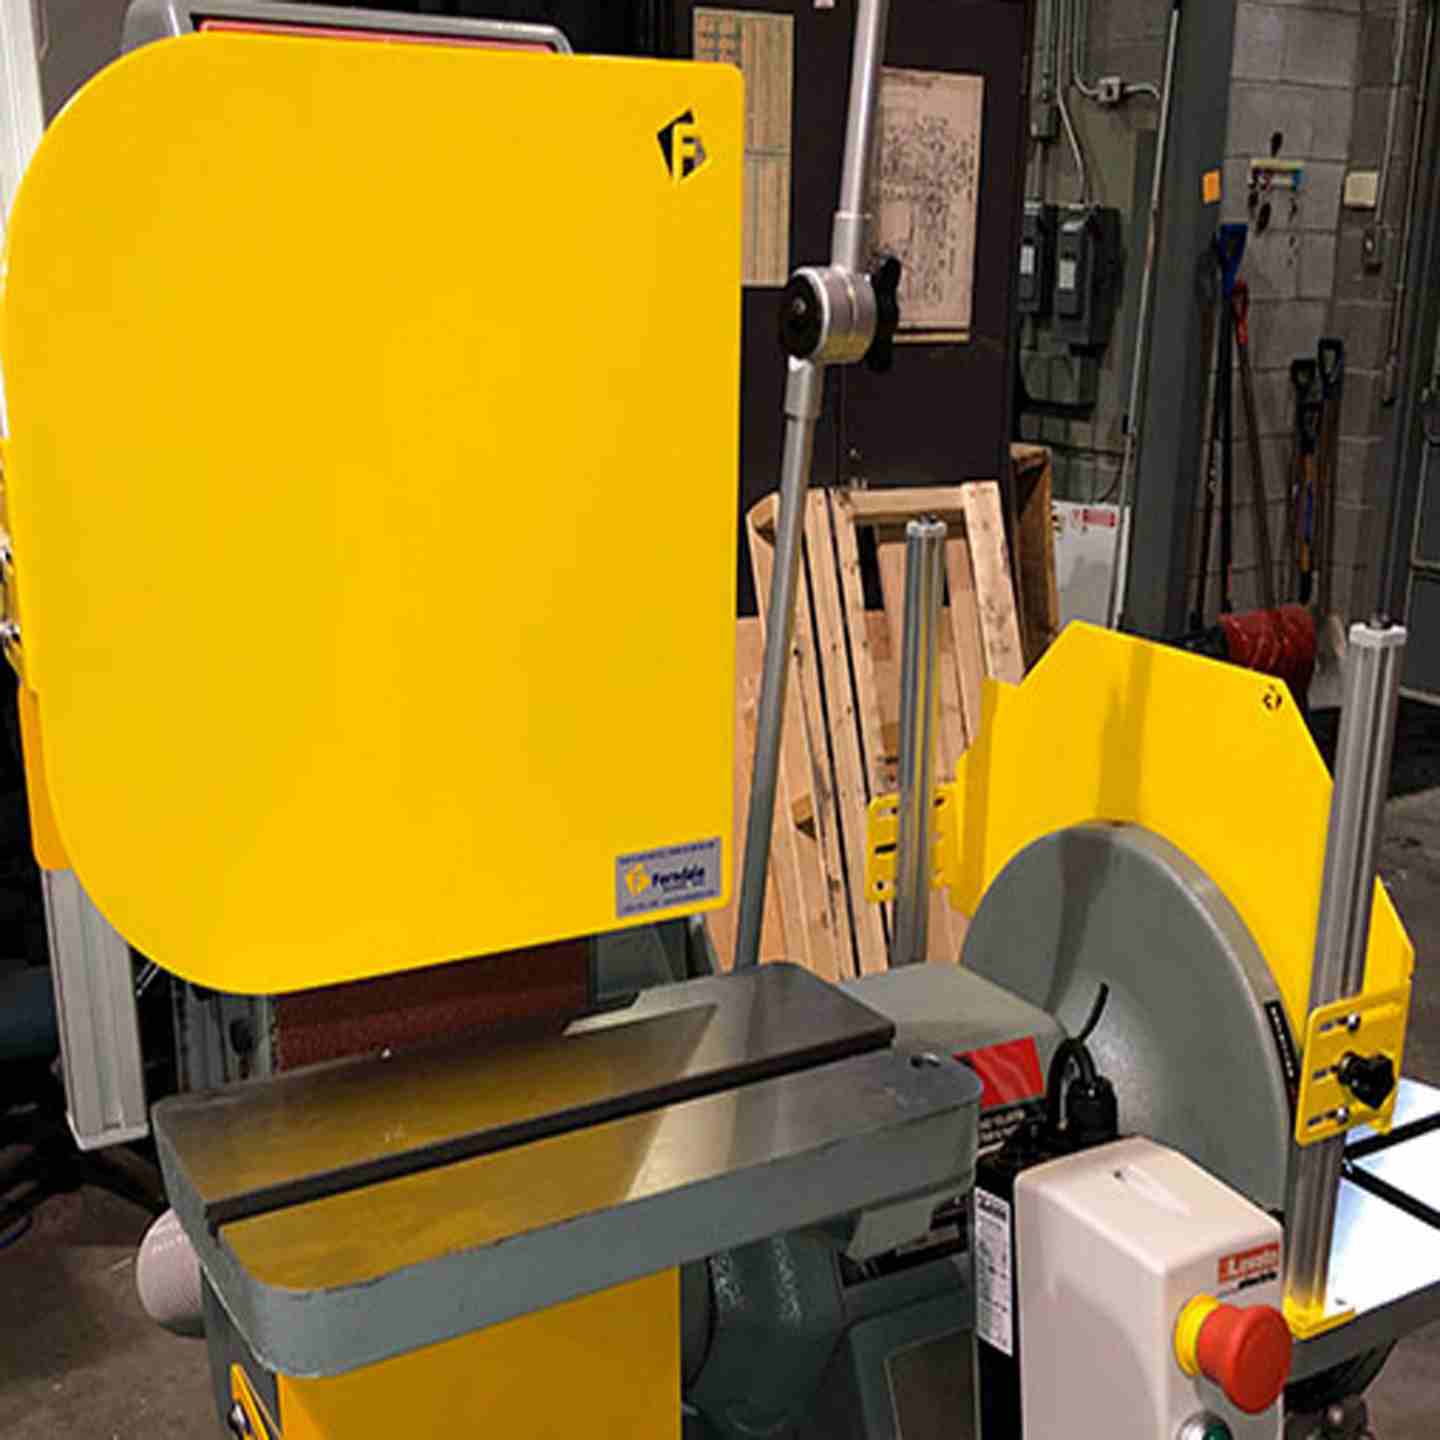
Bolt-on steel guarding to reduce exposure to abrasive belts, discs, and airborne debris.
Contact for Pricing
- Fits disc diameters of 6″, 8″, 9″, 10″, 12″, 16″, 20″, 24″, and 30″
- Fits belt widths of 2″, 4″, and 6″. shield faces measure 3.25″ × 12″, 7.25″ × 12″, and 11.25″ × 12″ respectively
- Disc shield adjusts vertically without tools and locks with two thumbscrews per side
- Belt shield adjusts vertically via a side knob to match workpiece size
- Secondary lower cover included with disc guards, mountable on the left or right of the primary guard depending on disc rotation direction, closing the gap the main shield does not reach
- Welded steel construction with powder-coated finish
- Bolt-on installation directly to the existing machine table
- Ships pre-assembled with mounting hardware
- Retrofit path for legacy sanders being brought up to OSHA 1910.212 and 1910.213 guarding expectations
- Not rated for hot work — grinding, welding, soldering, or cutting
Contact for Pricing
SALE
Adjustable Belt and Disc Sander Shields
Bolt-on steel guarding to reduce exposure to abrasive belts, discs, and airborne debris.
Contact for Pricing
- Fits disc diameters of 6″, 8″, 9″, 10″, 12″, 16″, 20″, 24″, and 30″
- Fits belt widths of 2″, 4″, and 6″. shield faces measure 3.25″ × 12″, 7.25″ × 12″, and 11.25″ × 12″ respectively
- Disc shield adjusts vertically without tools and locks with two thumbscrews per side
- Belt shield adjusts vertically via a side knob to match workpiece size
- Secondary lower cover included with disc guards, mountable on the left or right of the primary guard depending on disc rotation direction, closing the gap the main shield does not reach
- Welded steel construction with powder-coated finish
- Bolt-on installation directly to the existing machine table
- Ships pre-assembled with mounting hardware
- Retrofit path for legacy sanders being brought up to OSHA 1910.212 and 1910.213 guarding expectations
- Not rated for hot work — grinding, welding, soldering, or cutting
Contact for Pricing
Product Details
Troubleshooting Tips
Assembly
- Main welded steel guard assembly, sized to the specified disc diameter or belt width
- Mounting brackets and vibration-resistant fasteners, supplied pre-assembled to the guard
- Secondary lower disc cover (disc guard models), field-mountable to either side of the primary shield to suit disc rotation direction
- Thumbscrew or knob adjustment hardware for vertical positioning
Guards mount directly to the machine table. Some older or cast-frame sanders may require drilling into the existing casting to land the brackets.
Configuration Options
| Guard Type | Sizes | Model Prefix |
| Disc sander guard | 6″, 8″, 9″, 10″, 12″, 16″, 20″, 24″, 30″ | FER-DS |
| Belt sander guard (upper) | 2″, 4″, 6″ | FER-BS |
| Belt sander guard (lower, 6″) | 6″ | FER-BS-6L |
Applicable Safety Standards
- OSHA 1910.212
- OSHA 1910.21
Guard will not hold its vertical position
Shield creeps downward during operation or drifts after adjustment
- Verify both thumbscrews on each side are engaged; single-side tightening allows the shield to rack and slip
- Inspect thumbscrew threads and contact faces for abrasive dust packing - clean and re-seat
- Check for wear or galling on the adjustment slot edges from repeated vibration
- Confirm the machine is not transmitting excessive vibration through a worn bearing or out-of-balance disc, which will loosen any friction-locked adjustment
Guard will not mount flush to the table
Bracket does not sit flat, or fastener holes do not align
- Confirm the guard size ordered matches the actual disc diameter or belt width, not the nominal machine rating
- Check the table surface for weld beads, raised castings, or accumulated debris under the bracket footprint
- Compare the mounting footprint to the dimensional drawing for the specific model before drilling
- On cast-frame sanders, drilling into the casting may be required - verify wall thickness and clearance behind the drill point before proceeding
Exposed abrasive remains after installation
Operator can still reach the belt or disc from a normal working position
- Verify the secondary lower disc cover is installed on the correct side for the disc's rotation direction
- Reposition the primary shield to the lowest setting that still clears the largest routine workpiece
- On combination machines, confirm both belt and disc guards are installed - one alone leaves the other abrasive surface open
- If a gap persists at the table line, a lower belt guard (FER-BS-6L) or custom extension panel may be required
Excessive dust or particle escape
Debris exits above or beside the guard during sanding
- Lower the shield to reduce the open gap at the workpiece
- Confirm the machine's dust collection port is unobstructed and drawing at rated flow. The guard limits ejection but does not replace extraction
- Check for a bent or deformed shield edge from prior impact
- If the operation generates sparks, stop and reassess: these guards are not rated for hot work
Interference with workpiece or operator technique
Guard restricts the workpiece envelope or forces awkward positioning
- Confirm the shield is adjusted to the job rather than left at a fixed height between jobs
- Re-evaluate whether the disc size ordered matches the machine - an oversized guard covers more than necessary
- Some reduction in freedom of movement is expected and intentional; document any proposed modification through a risk assessment before altering the guard